I love to write, I love food, so "Goode Taste" was born. Please follow along as cookies crumble, the bread rises, and leftovers find new life!
Wednesday, May 27, 2009
Chick-fil-A Premier Night!
Even though the restaurant doesn't officially open until Thursday, my husband and I got to attend the invitation-only premier night on Tuesday. How did we get a sneak peek at the new CFA? Well, I was selected as one of the "Raving Fans" after I submitted this brief, masterful essay:
"My husband hates eating at Chick-fil-A with me. Could be because it takes me so long to eat! I savor every bite of chicken, drink every drop of the lemonade, and debate whether to get ice cream. I became addicted to Chick-fil-A in college when I ate there three times a week. It’s been hard living in Gaffney—my husband and I make sure to schedule a Chick-fil-A stop on all our road trips. I like supporting Chick-fil-A because the company sticks to its values, helps out in the community, and takes care of its employees. No other fast food restaurant has better food or customer service."
Of course, my essay didn't cover all the reasons why I'm a fan since it was limited to 100 words. I had to leave out that simply thinking of a chicken sandwich with pickles and a diet lemonade brings a smile to my face... The cow mascots are super cute... How I respect the fact that the company sticks to its values (not being open on Sundays is one example.)
Okay, back to the premier recap! We arrived just after 6 p.m., and had to park at the back of the very crowded parking lot since we weren't the only "raving fans." The two of us huddled under a mini-umbrella as we dashed from the Rav4 to the red carpet leading into the restaurant (after arriving soaking wet wearing white pants didn't seem like such a good idea). We grabbed a booth in the corner since most of the tables were taken (and I didn't want anyone to see my now see-through white capris). We had our drink orders taken at the table, and then we got our picture taken with the cow mascot. To keep the ravaging masses from storming the kitchen, workers passed out samples of chicken nuggets. Did you know the chicken arrives fresh at the store, and once cooked it only has a shelf life of one hour? See, you learned something from reading this.
To keep the crowd occupied, we heard speeches from the owner and a couple of people from the Chick-fil-A corporate office. They also handed each guest 10 coupons for free sandwiches and biscuits and asked us to GIVE THEM AWAY! Alright Chicken People, since I took the Chick-fil-A Ambassador Pledge and you gave me a free meal, I'll pass most of them out. Okay, okay, I'll give them all away since I love CFA!
Following Gaffney trivia, everyone lined up to place their orders, which took awhile. Hubby got a chicken sandwich with fries, and I got a chicken strips salad. Both were excellent. For dessert, servers made the rounds with milkshakes, cakes, and brownies. We picked out a brownie covered in chocolate icing and nuts and a cheesecake with strawberry syrup. Alright, maybe there is one thing I don't love about the place--I've never been a fan of the brownies. They are really dense, and I don't like icing on them. It's a brownie, not a piece of cake. The cheesecake was really good, but my favorite dessert is still a simple ice cream cone. After the meal the Chicken People held a raffle. I'm sad to say neither of us won anything, including the free food for a year. Oh well...
After the raffle we decided to forgo the kitchen tour and head home to our puppy. Upon our leaving we were each given a mini stuffed mascot cow and a travel coffee mug. Although we were disappointed that we didn't win the free meals for a year we are extremely excited our favorite fast food is now only a 5 minute ride away!
Tuesday, May 26, 2009
Chile-Garlic Spiced Chicken
Sunday, May 24, 2009
Blueberry Crumb Cake
This recipe calls for a 9-inch round baking pan, which I do not own. However, I do have a 9-inch spring form pan in my dresser (there's no room in my kitchen for all our pots and pans, so they are stowed in odd places all over the house) The spring form pan worked quite well.
I started out by making the streusel, and then I buttered and floured the pan.
The streusel
Using a stand mixer, I creamed the butter and the sugar for a full 5 minutes, per recipe directions. The mixture did become very light. After the 5 minutes I mixed in the rest of the cake ingredients (except for the blueberries.) The batter is light and slightly lemony.
Once the cake mixture came together, I tossed the blueberries in a little bit for flour to keep them from sinking to the bottom.
Then I transfered the batter to the pan and topped with the streusel.
Raw batter with the streusel
The cake was baked in a 350 degree oven, and it took 50 minutes for it to completely set up in my oven (and it didn't fall!). I let it cool in the pan for several minutes, but that's because I didn't know the the edges of the pan would loosen up considerably once the buckle was released (hahaha, I had never used a spring form pan before so I wasn't familiar with the mechanism). The cake needs to cool completely before you serve it.
The cake after I figured out how to remove the spring-form part of the pan. You can see that some of the blueberries stayed in the middle of the cake and didn't sink to the bottom.
But of course I couldn't wait for it to cool completely before digging into it after the scent of cinnamon and cake wafting through the house, so it was still a little warm.
The reason it took the cake so long to cool is I couldn't figure out how to get it off the pan bottom. Next time I will line the bottom with parchment paper so I can slide the paper off the bottom of the pan. In order to get the cake onto the cake saver, I had to put a dinner plate on the top of the cake, flip it, and then put the cake saver plate on top, and flip again. This is an act not for the faint of heart--it takes courage and requires fearless execution.
As you can see from this photo, most of the blueberries sank to the bottom. It could be I didn't coat the blueberries in enough flour to keep them in the middle of the batter. Guess that means I'll have to make this again... Oh, bother...
This was a good dessert, and got good reviews from the taste tester (my dear hubby). Not an outstanding cake, but a solid go-to recipe.
More Bread!
You may remember the bricks that I baked several weeks ago as I attempted a recipe for whole wheat bread. On the second attempt, the bread rose much higher on the second rise, and is nearly twice as high as the original loaf (yes, I saved it for comparison! That bread will now be used to feed some ducks).
I did encounter one other problem during the second attempt. While the loaf rose much higher, it fell in the center.
See the crack and indentation? That's where the bubble was.
The problem was a huge air bubble that developed in the center. When I punched the bread down after the first rise, I didn't get all of the big air bubbles.
Fortunately for the internet, I found Rose Levy Beranbaum's blog. She is a master baker and has several videos posted on her website, and one was about creating loaves of bread.
Last night when I baked bread, I made sure to dimple it before rolling it into a loaf-- the bread was fine and did not fall this time!
Monday, May 18, 2009
Cake Mix Doctor Peanut Butter Bars
In preparation for the trip to
These are really good and really rich. You can get them completed in under an hour, and it makes about 24 bars.
Here’s what you need:
1 package of yellow cake mix
1 cup of peanut butter (I used smooth, but you could use crunchy)
1 stick of butter, melted
2 large eggs
1 package (2 cups) of semisweet chocolate chips
1 cup of chopped walnuts (or any kind of nut-the original recipe called for pecans, but all I had were walnuts)
1-14oz. can of sweetened condensed milk
2 tablespoons of butter
1 cup of sweetened flaked coconut
2 tsp. vanilla extract
The bars will be baked in a 13x9 inch baking dish. You don’t need to grease the dish since there is so much butter in the recipe.
Preheat your oven to 350 degrees.
Mix together the cake mix, peanut butter, the 1 stick of melted butter, and eggs in a mixing bowl.
The batter will be thick so you will need to scrape down the bowl.
Reserve 1 ½ cups of the cake mixture for the topping (this is super easy if you have a 1 ½ cup measuring cup—thanks, Dad! Mine are from Williams-Sonoma).
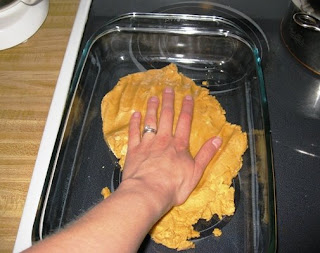
Put the remaining crust mixture in the pan, and use your fingertips to press the crust evenly over the bottom of the pan so it reaches all sides.
It won’t look like you will have enough dough, but you will, just keep working it out. Set the pan aside.
To make the chocolate filling, put the chocolate chips, condensed milk, and 2 tablespoons of butter in a saucepan over low heat (be patient, it will take several minutes--you don’t want it to burn).
Be careful and don't make a mess like me!
Stir and cook until the chocolate is melted and mixture well combined. Remove the pan from the heat and stir in the coconut, nuts, and vanilla.
Pour the chocolate mixture over the crust, and spread it evenly using a spatula (I found an offset spatula works really well) to the sides of the pan. Use your fingers to crumble the reserved 1 ½ cups of crust mixture over the chocolate and put the pan in the oven.
Before baking
Bake for 25-30 minutes until the cake mixture is a light brown. Remove the pan and put it on a wire rack to cook for 30 minutes.
After baking
Once the mixture is cool, then cut up into squares. It may take it awhile to cool, especially if it’s warm in your kitchen. In fact, I cut the bars, then put them into the fridge to harden up so the chocolate wouldn’t ooze out (not that it is a bad thing when chocolate oozes, it’s just very messy).
Anne Byrn suggests for long term storage, wrapping the bars in aluminum foil and freezing. I had to do this rather quickly after making them so my husband and I wouldn’t be tempted eat the whole batch!
Notes: When using a hand-held mixture, I use these bowls that have a piece of rubber on the bottom (special thanks to Mama for ordering these for me). After all, as cool as those stand mixers are, they can be kind of a pain to clean.
Thursday, May 14, 2009
Menu Planning
Since I won't be able to go to the store this weekend and may not get there until Monday or Tuesday, Sunday will be spaghetti night and Monday will be black bean & bacon smash and brown rice . I keep all of the items for these two recipes in my pantry and fridge (and I always have a supply of spaghetti sauce in the freezer). The black bean smash isn't a very pretty dish, but it is super easy, super delicious, and is actually ready in half an hour.
Black Bean & Bacon Smash (this is a slightly modified Rachel Ray recipe)
Extra-virgin Olive Oil*
3 slices bacon, chopped
1 onion, chopped
1 tablespoon of minced garlic
1 chipotle chili in adobo, minced
1/2-1 tsp. of adobo sauce
2 cans of black beans, drained
Salt & pepper to taste
1 tablespoon of ground cumin
Chicken stock (just in case)
Heat a saucepan or medium pot over medium high-heat. Chop the bacon and add it to the pan. While the bacon fat is rendering, add the onion to the pan. Once the onion is tender, add in the garlic and chili, and let those cook for a couple of minutes. Then, add in one can of the black beans. Smash the bean mixture in the pan/pot with a potato masher (this will help thicken the dish later on. You don't want to pulverize everything, but most of the beans should be mashed). Next, add in the remaining can of black beans, adobo sauce (per taste), the cumin, and the salt and pepper. Let that simmer for 15 minutes until the beans are cooked through and are thickened. (If the mixture is too thick, you may need to thin it out with some chicken stock or water).
Serve over brown rice. In our house, we top the beans with Monterrey Jack cheese or salsa verde.
Leftovers of this recipe make a great sauce for pizza. Just buy some dough from the store, blind bake it in the oven according to the package directions, and spread on the black beans and top with Monterrey Jack cheese. Put it back in the oven to heat the sauce and melt the cheese-- yum!
Since I'm rice-challenged when cooking rice on the stove, I bake mine in the oven. Thank goodness I saw that episode of Good Eats or we would be eating waterlogged rice every week.
Baked Brown Rice
1 1/2 cups of brown rice
2 1/2 cups of chicken broth/stock
Cooking spray
Preheat your oven to 350 degrees. Spray a casserole dish with the cooking spray, and pour the uncooked rice into the dish. Next, bring the stock to a boil. Once the stock is boiling, pour it over the rice, give everything a stir, and cover the dish with an oven-safe lid or aluminum foil (just make sure it's tight-fitting). Pop it in the oven for 1 hour. After the hour is up, take the rice out of the hot box, fluff with a fork, and serve.
*I find the use of cooking oil to be very personal-- lots of recipes call for a lot more oil than I feel is necessary. I probably use between 1-2 teaspoons when a recipe calls for oil for sauteing.
Also on tap for next week is a macaroni & beef dish I'm experimenting with, along with the Goode family meal slated for Friday night.
Monday, May 11, 2009
Herb update
Tuesday, May 5, 2009
Seafood skirmish no more!
First, I sprayed a baking dish with olive oil cooking spray, and cut my .64 lb. salmon fillet into individual pieces. Then, I squirted the fish with lime juice, and sprinkled on salt, garlic powder, and pepper. Finally, I drizzled it with olive oil. The dish was covered in foil and put in the oven for 20 minute at 350 degrees.
On the side we had sauteed squash and onion, and whole wheat cous cous with zucchini. For the cous cous, I sauteed diced onion, garlic, and zucchini in olive oil, then added chicken stock, brought that to a boil, and added the cous cous.
Sunday, May 3, 2009
Building Blocks & Enchiladas
Today I spent my lazy Sunday morning/early afternoon baking blocks (oops, I mean bread). After my success making honey oatmeal bread on Wednesday, I was the master of baking. So, instead of buying bread at the store this week, I decided to make my own. So confident was I that I decided to bake two loaves of a new recipe (recipe will remain anonymous for now since the end result was likely an error in execution). Wow, big mistake. Not only did I bake a new recipe, I used a different kind of yeast, which cost big-time when it came to the dough's rising. Following over 2 1/2 hours of rising time (on the second rise), I figured it wasn't going to get any better and baked the loaves. They came out resembling bricks, but do taste okay despite being so dense. Oh well, just one stumble as I take steps towards becoming a master baker :-)...
Saturday, May 2, 2009
Neiman Marcus cookies
Since Will, my dear husband, was going to visit his Dad and brother. Well, let me start over-- he was really going to see the Virginia Tech spring football game and is just so happens his family lives 20 minutes away from the Hokie stadium. At any rate, I had to bake some cookies to send to Vern and Jay. (And yes, I have to bake something sweet whenever we see them-- it keeps me on their good side :-)). Rather than make the usual chocolate chip or peanut butter cookies, I made the "Neiman Marcus" cookie recipe* that my mother had emailed to me several months back.
Herb Garden
Alright, all these Food Network chefs/cooks/hosts got to me. I'm curious as to how much better fresh herbs are in recipes rather than dried. And let's be honest, buying fresh herbs at the local grocery store is hit or miss (What! No basil! And I was going to make pasta sauce today!), not to mention pricey. My solution: plant an herb garden. This is an adventure for me, I'm a very green when it comes to gardening. I usually plant a bunch of annuals each spring, water them when they start to shrivel, and hope they last for the fall.